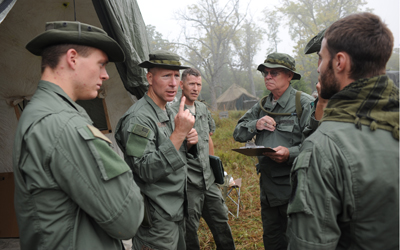
Know Your Gear – Sighting Systems
One of the most crucial parts of any weapon is the sighting system. Without an ability to align the weapon with the intended target, the deployment of that weapon can be disappointingly fruitless. Examining the various systems available can help you select the most appropriate one for your application and needs.
Hand-Eye
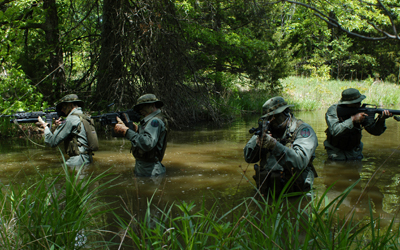
Although early thrown or hurled weapons had no mechanical sighting system, there was a system that is still in use today with modern weapons. Simple hand eye coordination is used to launch a weapon at its intended target. The downside to this primitive method is the training and practice required to become effective enough. But once learned, it is a proven reliable system. There is nothing mechanically to fail or lose, unless the human body itself is damaged.
This method is still applicable to modern firearms. Holding the fore grip of a rifle with the index finger extended along the bore of the rifle is an expedient alignment method for night time engagements. Simply establish the four points of contact with the rifle as normal and “point” to your intended target.
Self-defense marksmanship, typically with a pistol, employs this method. Unless your profession affords you the ability to practice with tens of thousands of rounds a year for many years, most people will default to simply pointing their pistol at the threat and squeezing the trigger, even if they have taken a few pistol classes. The more “primitive” brain takes over. No front-sight focus, no ball in a cup, no 3 dots aligned – simply point and shoot.
Iron Sights
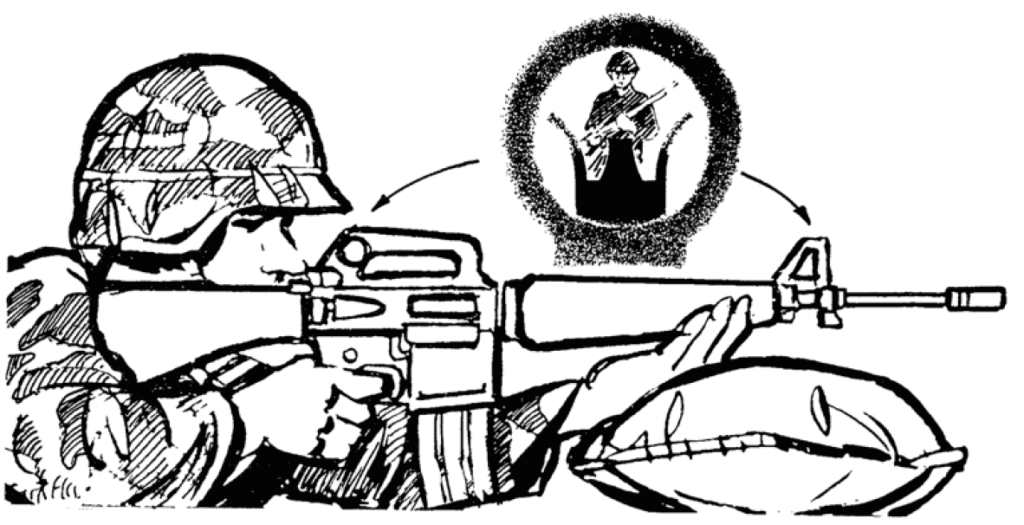
By nature of the design of firearms, there has always been somewhat of a built in sighting system – the barrel itself. Notch and post type iron sights added to the barrel allow a greater fidelity of alignment, especially with longer barrels.
Sight radius is an important consideration when using iron sights. Any perceived offset between the front sight and the rear sight becomes more difficult to predict the closer the two are. Conversely, a longer sight radius affords the user the ability to detect small deviations in alignment. This basic principle holds true regardless of the style or shape of the front and rear sights.
There are a few considerations when choosing the style of iron sights. Fixed vs. folding, rear sight shape and front post width, and even self-illuminating sights.
Fixed sights rarely “break” or fall off and seldom jostled out of alignment. Folding sights on the other hand, are not typically integral to the structure of the weapon. They have a greater chance of falling off or shifting relative to the bore due to impacts or thermal expansion and contraction of the various components. They do however provide a low profile and therefore less chance of snagging on your gear or the environment around you. This makes them suitable as a backup to a primary optic system.
Rear sight selection basically comes down to a grove or a hole. Grooved rear sights are lower profile and generally work better in low light. One downside is that the top surface that the top of the front sight post is to align to, tends to gets indistinctively blurry. It’s hard to decisively tell where the top of the rear sight is, especially when it’s intended to be blurry in relation to the front sight. This is due to the difference in what is known as the umbra and penumbra – the primary and secondary shadows that form.
Circular or diamond shaped rear sights, allow the eye to more naturally find center of the intentionally blurry rear aperture. However, because of the nature of an aperture, it limits the amount of light from the target area that can enter the eye. These systems often remedy this by including a daytime (smaller) and a nighttime (larger) aperture that is flipped or rotated in exchange for the other.
The front post width is also important. Too wide and you lose the ability to determine the exact center of the post, and therefore where the round will impact. Too narrow and it becomes difficult to quickly pick up in a “must shoot right now” situation. As a general rules of thumb, the longer the expected target, the narrower the front sight post.
Wider than ideal front sight posts can be sighted-in in such a way that the left or right corners of the front post become the impact point at longer ranges. This method still makes the system accurate at close ranges as the adjustment necessary is of negligible effect.
Optical Sights
Optical sights, magnified or not, allow the focal plane of the eye to be on the target rather than the front sight post. This makes target acquisition and weapon alignment more natural as the eye does not have to rapidly change focal planes. A reticle or other shapes are used to align the optic, and therefore weapon, with the target.
Non-magnified optics, allow for a natural transition from iron sights. It should be noted that optics do not necessarily make the shooter more inherently accurate. Much like the misconception with visible lasers, without proper fundamentals, they just allow the shooter to watch their point of impact shift suddenly off target the instant just before the shot breaks.
With proper fundamentals, non-magnified optics like red dots or rings allow for fast engagement, particularly of targets within 300 meters. Dot size can become an issue as larger dots may cover the entire target at ranges beyond 200 meters resulting in an ambiguous impact point. As such these are more typically used for relatively close engagements. Also, as these are often battery powered, reliability becomes an issue. Batteries die, lenses crack or fog.
Magnified optics allow for target detection at longer rangers. Usually 300-400 meters and beyond. As such, they are typically mounted to weapons capable of effective fire at those ranges. They can be passive, or have battery powered or other self-illuminating features. Usually, because of their bulk and relative sensitivity, they are typically associated with special purpose weapons that maximize their benefit. As such this limits the speed at which they can be employed at shorter ranges. This can be mitigated by using them in conjunction with offset red-dots or iron sights, but at the cost of weight and bulk.
Electro-Optical
Electro-Optical sights amplify ambient light and/or convert an invisible band of the electromagnetic spectrum into a visible. They typically convert the infrared (heat) spectrum. These systems both gather light from the target using lenses, and focus it to a receiver that amplifies or converts that signal onto a display that is then sent through lenses towards the user’s eye. They can be magnified or not.
The most common and familiar is night vision. The familiar green image is the output of an image intensifier. The human eye is able to distinguish the most variance amongst shades of green, and as such green was chosen as the output. Night vision systems amplify ambient light as well as detect infrared light. These systems are either passive or active by means shining an infrared light not visible to the naked eye, towards the target. The IR light effectively “paints” the target allowing the image intensifier to further enhance the image.
This technology has undergone many generations and advancements that are much too technical for the scope of this article. In general the system can be face mounted or weapon mounted. Face mounted solutions allow for target detection whereas weapon mounted solutions afford target engagement.

Although there are “auto-gated” features available for use in changing light conditions, these sights are limited to night time use. Additionally because of their limited service life, expense, and sensitivity, they are often restricted to special purpose weapons and forces. They are removed for daylight operations.
Thermal sights operate in a similar manner except they amplify and convert heat signatures into a visual representation, typically black and white. “White hot” or “black hot” settings are available, allowing the temperature gradient to be displayed per the user’s preference. These systems rely on contrasting heat signatures between a warm target and its cooler background.
Unlike night vision systems though, they allow for rapid target acquisition as warm targets are practically highlighted for the user. These systems are highly sensitive and extremely cost prohibitive. There are even systems that combine night vision and thermal imagery. Be prepared to drop as much as a decent new car on these systems.
Conclusion
Each system has its own advantages and disadvantages. Each should be carefully weighted to the environment you will be operating in. Just because elite forces have expensive sighting systems, that doesn’t necessarily mean you will see a benefit if you start using it too. Weight your needs and desires against factors of cost and reliability and the benefit you perceive.
If I could, I’d have one of each.
Know Your Gear: Sticks & Stones – Force-on-Force Platforms
The phrase “practice makes perfect” has become commonplace and for good reason. There is no better way to improve a skill than by actually doing it. This mantra also rings true when it comes to armed combatives. Throughout history warriors have used “force on force” sparring to train for battle. It’s no surprise that well-practiced warriors have proven infinitely superior.
Today battles are fought with modern firearms – pistol, carbine, rifle and various crew-served weapon systems like the venerable machine gun. Warriors still train with their weapons, and weapon facsimile just as warriors such as the Samurai used wooden sticks to practice swordsmanship.
There are a handful of weapon simulation platforms available for force-on-force training. I have been lucky enough to train extensively with each of the major simulation platforms over the years, and will offer an assessment of each system. This includes Paintball, Airsoft, Simunition®, MILES and Nerf. Yep, even Nerf.
To assess any system we need to establish our metrics. We’ll use a rating system of ten points. Our five metrics include cost, realism, range, feedback, and safety.
(1.) Cost of the system is pretty self-explanatory, but we’ll try to include information regarding the purchase, operation, and upkeep expenses. (2.) Realism includes both the look and feel of the weapon simulation platform, but also the level of stress induced. (3.) Range includes the distance a shooter can expect a 50/50 chance of hitting a human-sized torso while under fire. (4.) Feedback involves how the simulation platform indicates a hit on an opponent. (5.) Safety, our last but arguably most important category explores the inherent risks to the users.
Nerf = 3.5 Rating
I started wargaming at a young age when my mom bought me my first Nerf guns. Large sofa forts were constructed and neighborhood kids gathered for epic dart wars in the trenches of La-Z Boys. Now at the time, I definitely did not consider my Nerf battles to be a representation of battle. However as I recollect, if it wasn’t force-on-force training then what was it?
As a simulation platform Nerf is overall quite lousy. The realism is poor and Nerf is clearly a flimsy toy with no stress value. The effective range is about 5 meters, tops. There is virtually no feedback as the Nerf dart leaves no mark and inflicts no pain. Yet given those obvious shortcomings, Nerf guns are very affordable to purchase and maintain, and are a hellacious amount of fun! Nerf is quite safe when used with any pair of sunglasses and it allows junior warriors hours of trigger time.
Paintball = 5.5 Rating
As I grew older I yearned for a new and more exciting game of war. This came to me in the form of my first job at a local Paintball field, where I quickly became a proficient and regular player. I was able to play so much Paintball that in just a couple years’ time I was playing at a professional level and was sponsored in national tournaments around the country with the KC Impact, Explicit Content, and Diesel teams. I really enjoyed the small unit micro-tactics of “shoot, move, and communicate” that were so essential to Paintball.
The cost of Paintball is middle of the road at several hundred dollars for the marker and protective gear, plus up to $100 for a single day’s game. The realism of the marker is low, but the stress induced is very high because a Paintball hit leaves a painful bruised welt. Range is also midland with an effective range of about 60 meters. Feedback receives a high rating because the Paintball breaks on the opponent leaving a mark. And when used properly with the required protective equipment, safety receives a middle score as well – although there have been rare cases of eye injury due to improper use.
Airsoft = 6 Rating
I continued to develop into even more of a “war nerd.” I started looking for something that was more realistic than Paintball so I joined the Kansas City Airsoft Association, a military simulation (MilSim) community. It was through Airsoft MilSim that I was finally able to sink my teeth into the fire and maneuver of battlefield tactics.
An Airsoft gun runs several hundred dollars and there is a slight amount of maintenance involved. Cost savings come in the very affordable ammunition of 6mm plastic BBs – making a daylong game very affordable. The realism of Airsoft is superior as most guns are 1:1 replicas in size and nearly the same weight. Airsoft hit produces a more modest sting than Paintball, but is still stress inducing. Yet the weakness of Airsoft in realism is that it sounds like a racecar toy when it fires. Very disappointing. Range is also limited at an effective distance of just 60 meters. And there is virtually no feedback to the shooter because the plastic BB leaves no mark. Safety is good if the proper protective goggles are used, although there has been an occasional eye or tooth injury when improperly protected.
Simunition® = 6.5 Rating
As my experience expanded into “real steel” firearms and tactical training I joined Summit Tactical, a community of law enforcement and security professionals that focused on the tactical use of firearms. Through this community I was afforded the opportunity to use Simunition® – a sort of hybrid between Paintball and blank ammunition. Simunition® rounds use gunpowder to project a plastic paint filled bullet from a simulated firearm upper attached to an actual firearm. Military, law enforcement and security teams often use Simunition® for force-on-force engagement training.
The Simunition® system is prohibitively expensive, costing as much as an actual firearm. They are relatively affordable to maintain, however the real expense is in the ammunition with can run $1.75 per round. That said, Simunition® receives top scores for realism because it employs the lower half of the firearm it is simulating. And painful hits on target create a stressful training situation. Ranges of 45 meters are acceptable for pistols, but lackluster for rifles and carbines. Simunition® does leave a mark on the target, offering good feedback. But it is known to sometimes over-penetrate. Given the relatively small numbers of professionals using this platform, it has produced a small but worrisome number of injuries.
MILES 2000/IWS = 8 Rating
My path through gaming and toward more serious training led me eventually to One Shepherd. This training institution uses immersive tactical gaming in military simulation to teach the constructs and processes of leadership. This struck me as a strange approach, and although I was initially hesitant I participated in my first event and I was hooked for life.
One Shepherd employs the Multiple Integrated Laser Engagement System in its fourth generation (MILES 2000/IWS). MILES gear is an eye-safe laser that is fastened to an actual firearm. The firearm uses blank ammunition and a blank firing adaptor. The laser is activated by a combination of light from the muzzle blast plus an internal mercury switch that detects the recoil of the weapon.
Yet the purchase and maintenance of MILES is so excessive that it is the only simulation platform to receive a flat zero for costs. The blank ammunition keeps operational costs similar to paintball expenses. Realism receives high marks because MILES is used in conjunction with real firearms, including the flash and recoil of blank ammunition. And while there is no pain involved, experienced warriors still find themselves under considerable stress when the “near miss” tone beeps during the chaotic noise of battle. Engagement ranges are phenomenally good, easily engaging targets at 400 meters and even out to 800 meters (a half mile) with small arms weapons. Feedback provides not only “near miss” and “kill” shots, but identifies who shot whom and with what weapon system. Even hit/miss statistics are available. Finally, safety is very good because MILES emits nothing more than an eye-safe beam of light.
MILES deserves a further mention in this article because it is the only integrated system on our list. That means tanks, helicopters, rocket launchers and crew served weapons are fitted with MILES to engage targets at realistic ranges – even miles away. No other simulation platform can accomplish this because they all involve projectiles, and the energy necessary to achieve such ranges would be consistently lethal to exposed warriors at close range.
Keep in mind that no simulation platform is perfect. When firearm simulation behaves exactly like a bullet, it is fatal. So imperfection is the price we pay for safe, non-lethal force-on-force simulation.
I am reminded of the childhood taunt “sticks and stones may break my bones” – yes, but bullets usually kill. And harm is not the intent of weapon simulation. The purpose of any force-on-force simulation platform is to offer as realistic combative experiences as we can afford. When taken seriously any of the aforesaid platforms can be beneficial to warrior training.
Beyond the Square Range
I find myself watching videos on YouTube again. Most of the time it points me towards videos of firearms training or competition. Not surprising since that is one of my interests. I’m always amazed how proficient the top competitors are. Whether it’s IDPA, IPSC, or 3-Gun, I usually end up finding videos where my jaw hits the floor. The speed and accuracy they are able to achieve is absolutely mind-boggling. As an occasional competitor myself, I can certainly appreciate the level of training and dedication it took to get where they are.
The tactical trainers are just as impressive. The biggest difference of course, is they generally demonstrate their skill while wearing more practical and tactical equipment. There are no race guns; no special shot shell loaders – just practical firearms and equipment.
There is something amazing about watching a Steel Challenge shooter hit 5 plates scattered about in just a few seconds. Watching guys decked out in full armor punch out of a vehicle blasting an array of steel targets while flash-bangs go off is just down right cool.
However, what I like about these videos is also what I despise. Is this what the peak of firearms training looks like? Well, why shouldn’t it be? These people are international champions – quite literally Grand Masters at what they do. The tactical trainers are often combat veterans, guys who have been there and done that. Of course we can learn something from them. But to what end?
If competition is your bag, then its obvious that path of training will lead you to a level of marksmanship and speed unlike any other game in firearms. Yes – game. I don’t mean that as a pejorative. Not at all. Really. It’s perfectly okay to be a professional baseball player. Why shouldn’t it be okay to be good at a game involving firearms?
I know what some of you are thinking. I agree that there are skills that can be learned from competition that can apply to a real world gunfighting situation. However, it’s not difficult to see that its a game. First, there are rules. The targets don’t shoot back. They behave predictably. The majority of the time, the competitor is allowed to walk the course. They get to know where all the targets are, where to stand, what target activates movement on another target. They get to plan their round count and at exactly which moment they will reload. It’s fairly clear this a game.
Now the tactical trainers seem to approach things a bit differently. Most of what I’ve seen focuses around a series of drills. Drills aren’t bad. Drills are good. They allow us to refine those tactile skills necessary to become a good shooter. But again to what end? It seems as though most trainers would have you believe that their culmination exercise or evolution is the moment where the purpose of their training becomes clear. Is it? By no fault of their own, most customers are led to believe so.
I’ve seen too many videos in which a shooting skill is applied by placing the shooter in a scenario where they are told to conduct a battle drill – without ever explaining the purpose of the battle drill. Neither do they explain the decision matrix. In short, they don’t tell the shooter why they are there or what they must assess.
Unfortunately, the result is a shooter who has a warped understanding of gunfighting and patrolling. No one second guesses why they are to engage and advance towards an overwhelming force of paper and steel targets in the middle of an open field all the while transitioning to pistols and clearing malfunctions with only the non-dominate hand. That is a poor tactical decision and is not an accurate representation of a gunfight at all.
I’ll suggest that is analogous to teaching someone who knows nothing of baseball how to hit a grand slam one-handed in the last inning of the World Series. It’s absurd.
In the shooting scenario above, wounded and hopelessly outgunned, my battle buddy and I would break contact and seek a new angle of attack. Anyone who would think otherwise is a grossly irresponsible leader that I wouldn’t follow. Don’t try to sell me a highly specialized skill as if it were a standard skill set of gunfighting.
Don’t get me wrong. I am not implying that instructors are intentionally negligent or malicious. For them, I imagine it is the best way they know to push shooting skills to the point of failure. It makes sense to create a high stress environment to test student manipulation skills and marksmanship. Yet unknowingly these instructors are providing a severe disservice. Students may walk away with unreasonable expectations of such unorthodox skills.
What is needed is a better contextual understanding of where and how these skills might apply. In order for that to happen battle drills need to be taught and understood – immediate action battle drills like hasty attack, break contact, and react to ambush. The problem is, that doesn’t sell.
People come to shoot their rifles. Most of the training is done in a classroom setting and square, one-directional range. In the “wowee” appeal of stress shooting, students are left with a unrealistic idea of gunfighting and tactics in general.
It is said that amateurs worry about tactics, while professionals worry about logistics. I think there is something to that sentiment.
Allow me to stretch that model into the current topic to suggest that amateur shooters worry about hitting the mark, while professional shooters worry about training objectives.
If we concern ourselves only with weapon manipulation and shooting skills, an admittedly a small percentage of warrior tasks and competencies, then we’re fooling ourselves. We’re putting people in scenarios without any regard for contextual understanding. As instructors we’ve then failed our students because we’ve established unrealistic gunfighting expectations for our students without teaching the warrior competencies of situational awareness and decision-making.
Always ask why. If your instructor cannot explain the context of the problem and its decision points – its time to find a new instructor.
This article was originally published on odjournal.com (Olive Drab: the journal of tactics) and has been transferred here with permission.
Know Your Gear: Load Bearing Equipment
It is said that since the days of Christ, the foot soldier has fought with 60 pounds of battle gear. Let’s talk “battle rattle” by looking at it in various forms, keeping in mind that each variation is designed to aid the modern warrior carrying and using a range of battlefield operating systems.
First we need to dispel with the myth that there will be a one-size-fits-all solution for battle gear. That’s simply not practical. Warriors carry a variety of weapons, from rifles to carbines to crew served machineguns, rockets and mortars. They carry various radios, night vision devices, medical equipment, plus breaching tools and explosives. This equipment requires specialized carrying gear.
Furthermore we have to consider the battle environment as well as how the warrior entered the battlespace. Mechanized and motorized infantry battle gear may look very different from airborne and air assault forces. And mountain warfare battle gear may look significantly different than urban warfare or jungle warfare equipment.
That being said, the US military has for the past 100 years projected itself across the globe in every conceivable battle environment. As such, there is an understandable effort to develop a system that effectively manages various demands on our Armed Forces.
This requirement for flexible, modular battle gear is not necessarily a requirement for all forces. Troops who are dedicated to a given geographic and environmental fight – such as the Alabama Home Guard or the Israeli Army – may not agree that battle gear needs to be so flexible. That is understandable.
So again, let’s be careful to avoid a “silver bullet” solution when we think about battle rattle.
Soviet BCP
In it’s simplest form, a warrior needs to carry his weapon, ammunition, and water. Two hands and a bandolier manage most of this.

An advancement over this hodge-podge system was the Bandolier Chest Pouch (BCP), first introduced by Soviet forces toward the end of the Second World War to accommodate for various weapons using “box” or “stick” detachable magazines. And since virtually all modern weapons use detachable magazines today, the BCP is still a relevant form of battle rattle.
The advantages of the BCP are its simplicity and affordability. It is used extensively by communist militaries throughout the world, and more recently has been introduced to the United States as viable battle gear. The BCP does what it was intended to do – carry ammunition.
Of course the limit of the BCP is also its disadvantage. It does not carry much else. And when beefed up versions of the BCP came out, they were so hopelessly front heavy and bulky that these variations were useless to everyone except those motorized troops who’s mission dictated that they would remain seated until the very moment before engagement, and even then it was only really suited for urban warfare. Troops certainly couldn’t crawl around in the dirt or comfortably hike up mountains with this large, unevenly distributed BCP.
Another disadvantage of the BCP is that it is not particularly easy to get in or out of this equipment. Straps go over the head, cross at the back of the shoulders, and another strap circles completely around the midsection. That can prove disastrous in the event a troop fell into deep water, or a wounded casualty had to be stripped to get to the wound.
The very recent introduction of PALS webbing, heavy duty nylon strips sewn onto various strap and pouch surfaces, attempts to address the shortcoming of modularity for the BCP. While small additions are appreciated on the shoulder straps and front of magazine pouches, as previously noted the weakness of the design rests with the unevenly distributed weight of the BCP.
Further recent additions of quickly detachable buckles make the BCP easier to get on and off. However, with between three and six buckles to hit in sequence, the warrior could still drown or bleed to death before the BCP was removed!
These shortcomings recognized, the BCP is still a decent choice for battle gear. It is affordable, simple, and with recent advancements it is a comfortable piece of gear. Coupled with a modern hydration bladder, the BCP is a streamlined, lightweight, minimal approach to battle rattle.
Commonwealth Army Kit
The British Army introduced what may be the first modern effort to modularity for various warriors and their weapon systems by the Second World War. This effort sees considerable improvement in the now-famous 1958 Pattern webbing, called “kit” and “web gear” by warriors literally around the world. It was copied by various militaries throughout NATO, as well as carried by common wealth armies in Australia, New Zealand, Canada, and South Africa. Influence of the ’58 Pattern webbing can still be seen today in the militaries of North Africa, the Mideast, and the Indian subcontinent.
Sturdy and comfortable, the British kit could carry various types of equipment. Yet it also had a significant disadvantage in that trying to be all things to everyone, British kit “fit everything, but fit nothing well.”
Since then the British have upgraded their kit multiple times, including the current Personal Load Carrying Equipment (PLCE) webbing introduced in 1988. PLCE is heavy duty nylon webbing rather than the old canvas webbing. Notably it includes pouches, scabbards and holsters tailored to specific gear while maintaining its modularity and a reasonable distribution of weight.
The downside is that as British kit advanced in its capabilities, it became more expensive and harder to find! When you can find British PLCE outside of the UK, you will pay a kidney for it. Yet it is incredibly formidable battle gear.
ALICE LBE
About that same time the Americans also enter the fray in earnest with the canvas M1956 and subsequent nylon M1967 All-purpose Lightweight Individual Carrying Equipment (ALICE), a.k.a. Load Bearing Equipment (LBE). The LBE is a modular approach to battle rattle.
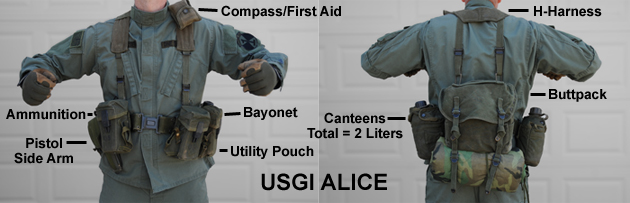
Like the British counterparts’ kit, the LBE pistol waist belt and shoulder straps are adjustable to fit a wide range of warrior sizes and heights. Unlike the British kit, though, the American LBE was suited to specific equipment and weapon systems from its very start.
LBE has the advantage of being an open system, that is, the straps make it a rather cool system for carrying equipment. When on parade LBE straps are tightened and the pistol belt fastened, lending to a very sharp uniformed appearance in the tradition of Roman Legionnaires. When going into battle, the LBE straps are lengthened and the pistol belt is often left unfastened or significantly extended. This lowers the ammunition pouches to below the hips, giving the LBE a bit of a “gunfighter” appearance. The modularity becomes a personalized to fit each warrior, and the entire rifle company takes on the look of helmeted cowboys.
Here in the United States, anyway, the LBE is readily available in both generations and is incredibly affordable. It never fit well around body armor, however, and because of this many US Soldiers and Marines found it somewhat uncomfortable to use with body armor.
LBV-88
Now there are those who insist senior US leaders couldn’t stand the “wild cowboy” image of US troops with unfastened pistol belts and low slung pouches. Individuality is an affront to the sensibilities of such armchair warriors.
Still others insist it was simply the LBE’s lack of design considerations for body armor, and the prevalent use of body armor that sent the designers back to the drawing boards 30 years later.zWhatever the case, the result was the M1988 Load Bearing Vest (LBV). The LBV-88 departed from the modularity concept of ALICE, though to be certain LBV used the ALICE pistol belt and many of the pouches, notably 1-quart canteens continued to be used with the LBV-88.
From the onset the LBV was a welcome piece of gear. It maintained its fit of a wide variety of troop sizes and wore more comfortably over body armor, as designed. Furthermore, with the magazine pouches up higher on the chest, the LBV harkened back to the BCP concept – but with a much nicer distribution of load weight, some modularity, and the ability to get the LBV on and off with the click of just two front buckles. Not a bad design at all.
Still, the LBV-88 was a dedicated vest. It didn’t suit machine gunners, grenadiers, radiomen, mortar men or medics very well. It needed greater modularity. It saw only 12 years of service.
Tactical Vest & Camelbak
Recognizing this shortcoming, Eagle Industries in the United States championed the TAC-V1 series vests – though clearly there are far too many competing manufacturers to note in this space. The TAC-V1 series vest attempted to do for every warrior what the LBV-88 had done for the rifleman. TAC vests tailor a specific, dedicated piece of battle gear to each warrior’s needs.
The idea was pretty sound. And certainly the uniform (non-modular) appearance of the TAC vests would get a nod of approval from those leaders concerned with a stylishly clean look on the parade grounds. However the expense and logistics of the TAC vests very quickly became a major headache!
TAC vests aren’t as adjustable as their earlier predecessors. There is a separate vest issued for warriors of tall, regular and short heights. This is true as well for large and small girthed warriors such as one might expect in the difference between a 40-year-old, 220-pound male warrior and a 18-year-old, 115-pound female warrior. And for those warriors who were in the middle range of sizes, they might very well need two TAC vests – one worn with body armor, one worn without.
And what if a machine gunner in the platoon was reassigned as a grenadier? There is no guarantee that they’d fit the same vests. So the idea of simply swapping battle rattle wasn’t going to work. Obviously a new vest must be issued for the new job. There is little modularity with the TAC vests because the pouch configuration is sewn permanently into each vest.
Additionally, the troops complain that TAC vests are too hot and that any serious physical exertion quickly causes overheating. Though comfortable and sturdy, TAC vests simply don’t ventilate well in hot climates.
Understandably the US Army, Marine Corps and Air Force adopted the TAC-V1 only on a very limited basis, almost exclusively issued to special purpose military police and security police. The TAC vest has seen greater success with civilian police departments, in particular with SWAT because specialization is precisely their requirement.
Yet an interesting and wildly successful development did come from the TAC-V1 series battle gear, and that was the introduction of the back-mounted hydration bladder, tube and valve. This item is commercially recognized by the name Camelbak, though again today there are numerous manufacturers of this fantastic yet simple evolution in canteen technology.
MOLLE
Modular Lightweight Load-carrying Equipment (MOLLE), pronounced “Molly”, replaces the older generation of “Alice”. American troops have a history of naming their equipment after women, and understandable fascination for healthy young males. Commonwealth forces are also using a variation of MOLLE called the Osprey modular system.
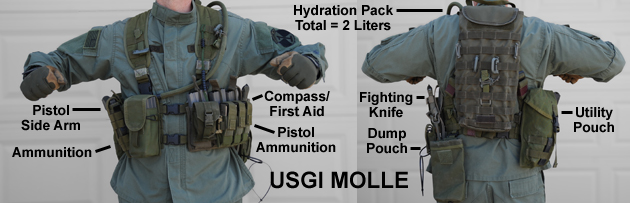
The MOLLE system incorporates an ample use of PALS webbing throughout, making this battle gear extremely modular and flexible for a variety of warrior missions as well as warrior sizes. Even the body armor and rucksack employ PALS so that pouches and equipment can be directly attached.
The Marines call this MOLLE system the Improved Load Bearing Equipment (ILBE) while Soldiers simply call it MOLLE. Though different names, both the US Army and Marine Corps use two-piece vest panels, known commercially as the Modular Assault Vest (MAV).
The MAV also comes in a one-piece panel configuration that offers more room for equipment, but this variation is less popular because it suffers the same design flaws as the BCP. Namely that would be a somewhat unequal distribution of the load weight to the front, and difficulty in getting the battle gear on and off quickly.
Still, the two-piece MOLLE MAV gear has been in service for a decade now and appears well liked by troops of various nationalities who’ve used MOLLE in the deserts and cities of Iraq, and the mountains of Afghanistan. It is robust, modular, allows for excellent distribution of weight and specialization to each warriors role in the mission. And the MOLLE MAV fits a wide range of warrior sizes, both with and without body armor.
The single criticism of the MOLLE MAV so far is that it is apparently designed for use with body armor, and some complain that it is difficult to lower the warrior’s profile and crawl on the ground. Still, the MOLLE MAV is modular enough to handle this by simply adjusting more equipment to the sides of the vest panels and back of the hydration bladder pouch. And MOLLE gear is considerably less hot than the earlier TAC vest variations!
Does it look good on the parade ground? No, not surprisingly. Wearing the MOLLE MAV the warrior assumes something akin to a potato shape. It is relatively comfortable, but the tradeoff is that because the modularity allows each warrior to custom fit their ammunition and equipment management, no two MOLLE MAV set ups are identical.
Surely as combat patrols fade in frequency, more an more senior officers and NCOs will insist that the MOLLE MAV stop doing what it does best – being fantastically modular.
This article was originally published on odjournal.com (Olive Drab: the journal of tactics) and has been transferred here with permission.
After Action Review: Process-Oriented Enhanced Performance
There is no better than adversity. Every defeat, every heartbreak, every loss, contains its own seed, its own lesson on how to improve your performance the next time. – Malcolm X
The US Army has used the After Action Review (AAR) since the end of the Second World War, although this process did not become institutionalized within the Army until the onset of the National Training Center at Ft. Irwin, CA in 1981. Notably, the AAR achieved the rare feat of instantaneous and unanimous hatred.
The AAR was despised by all. Battalion commanders, late-career lieutenant colonels, left the AAR tent in tears. Captains got into fistfights with senior NCOs in middle of the AAR process.
The AAR process seemed doomed to rejection, and yet today it would be very difficult to think of any military training program that didn’t incorporate the AAR process. It just required a little time to adjust our attitude toward criticism, and develop a culture around the AAR.
Let’s be clear, no one likes to fail. No one. And having another professional – a supervisor, subordinate or peer point out our failures publicly is humiliating. It humbles us as warriors.
If that is all we intend to achieve, to humiliate fellow warriors, then let us never employ the AAR again! If we are seeking blame, then lay blame. Don’t bother with anything so academic or constructive as the AAR. If it is blame we are seeking, then let’s wallow in the muck of despair and depraved, vindictive wickedness.
For the AAR is an exalted tradition. It is not about blame – instead it is about redemption.
Accordingly, if it is a process-oriented team-building performance enhancement we are seeking, then the AAR can get us there. We must embrace humility and remain diligently focused on redeeming our performance as a team.
The AAR follows a simple but effective four-step process. When available, a facilitator from outside the team is employed to regulate the flow of the AAR.
The Plan
In this step of the process the leader – defined as the individual responsible for developing Paragraph 3. Execution of the Operation Order (OPORD) – briefs the plan.
What normally happens at this point is that the leader begins back-peddling, or rationalizing his plan, or the leader may attempt to explain what did and didn’t go to plan from his perspective. This is understandable because the leader pours considerable time and effort into the plan, and feels that he should offer some insight into his thinking. Perhaps that might help.
Do NOT do this! Do not allow the leader to rationalize, explain, or even discuss what happened during the execution phase of the mission. The plan is the plan. The leader only discusses the planning phase at this point of the AAR.
This is important because the plan must be kept separate from the execution in discussion. We will invariably see that the plan does not perfectly match the execution phase of the mission, and the entire AAR process is focused on the gap between the plan and the performance!
So don’t discuss the performance at all. Not in the first step of the process. This cannot be overemphasized. The leader briefly explains the plan, and only the plan.
Now also watch other team members for a specific reaction when the leader is explaining his or her plan. Often enough, we will see confusion on at least one persons face during the leader’s explanation. Some troops might even interrupt the leader or turn to one another and say, “Really? I didn’t know that was part of the plan.”
This is critical, because it might very well mean that the team is experiencing a problem with the communication of the plan – regardless of how valid the plan was or wasn’t.
The Performance
Once the leader has given a brief explanation of the plan, the AAR facilitator opens the floor to the second part of the process, the discussion on the performance of the mission.
A simple technique is for the facilitator to ask, “Is that the plan everyone understood before the mission began?” This will almost always get the discussion rolling.
Can the leader take part in the discussion on performance in the field? Yes. Absolutely and the leader’s input is encouraged. But there is one caveat; the leader should not attempt to defend or explain his plan.
Instead, it is good practice to have the leader participate in this discussion of the team’s performance by asking questions rather than making statements. The point here is for the leader not to be confrontational, and not to defend his or her actions.
What happens during this discussion is that we find the age-old Clausewitz axiom still holds true, “No plan survives the first shot.” There will inevitably be a gap between the plan and the performance. More shocking still, sometimes the gap is a positive gap, meaning the team does far better in performance than anyone expected. There are lessons here, too.
The Issues
At this point in the discussion the normal human tendency is to begin to explore what caused the gap between the plan and the performance. What issues gave cause to that gap?
Sometimes the issues are immediately apparent. If team members are saying, “I didn’t know that was our plan” during the first step of the AAR then it’s pretty obvious in the third step, the issues, that communicating the plan didn’t go so well. Now we have to determine why.
Sometimes the issues aren’t immediately apparent. This takes some brainstorming as a team. It means being brutally honest, even when it’s painful to do so. Redemption can only be achieved through candid reflection and accounting of our performance.
The Fix
Once we have identified the issue, we need a fix. Let’s be very clear here, the fix is not some obtuse comment to the sum of “oh, I guess I shouldn’t do it that way next time.” Nope. The fix is achieved with an assigned name and date/time due.
It is sometimes the case that we don’t even know what the fix will entail. But with an assigned name and date/time due we can still rest assured that we will address the issue. For example, if the issue is a radio procedure that breaks communication security (COMSEC) then we can turn to the team’s RTO and say, “Corporal Espinoza will have a fix for this issue at 0900 Friday morning.”
Until we have a fix in place, we have not addressed the issue. Merely complaining about the issue is not a fix. Don’t assume that it has been addressed simply because we all agree.
Will we always agree on the issues and fixes? No. Consensus is good, but not required. If the leader is satisfied that this is the correct issue and fix, so be it. It will soon be put to the test again, and the leader is ultimately responsible for the success of the mission.
Do all issues require improvement as a fix? No. Fixes come in either an identified need to improve a deficiency, or an identified success to sustain. Fixes can be either an “improve” or “sustain”.
We must not be afraid to take account of our successes, too. This is prudent and wise.
What the AAR is not…
In our enthusiasm for performance enhancement the US military has culturally embraced the AAR process. Yet the term “AAR” now generically refers to many forms of feedback. Regrettably this causes more harm than good.
The AAR is not a “hot wash”. The hot wash is a viable feedback function by which an assigned Observer-Controller (OC) in the role of either a mentor or facilitator offers their perspective to the team. This perspective comes most commonly in the format of “three up, three down” – meaning the OC offers three issues the team needs to improve upon and three issues the team needs to sustain. And again, the hot wash can be a valuable form of feedback. But the hot wash is an external perspective, outside the team. It is not the sort of tradition of reflective practitioner that the AAR offers.
The AAR is not a “sensing session”. This form of feedback is intended to help the command team or a training institution address shortcomings. Again, the sensing session is a viable form of feedback and it does come from within the team or student body. But because there is no clearly defined plan to be compared to the performance, the sensing session does not explore a gap in performance. Nor does the sensing session address the specific fix through an assigned name and date/time due. At least it does not do so for the sake of team members or student body of an institution.
The AAR is a process-based performance enhancement tradition. It is achieved internally to the team and requires a candid reflection and inventory of our performance as compared to our plan. Yet we must also be diligent in keeping this valuable tradition of feedback from becoming a blame-game intended on humiliating fellow warriors. If the AAR turns to this, it will fail in its purpose. That purpose is the redemption of our team on our path to excellence.
This article was originally published on odjournal.com (Olive Drab: the journal of tactics) and has been transferred here with permission.
Leadership Styles: Calling warriors to do their best
There is no single, magical solution in leadership style. The cliché of “one size” does not and will not fit all situations. For this reason it is best if we are aware of the various leadership styles; the situations in which each is best suited; and the limitations of each style.
How do we choose our own particular style? Some experts insist that we don’t! One popular contention is that we default to specific leadership styles given the particulars of each situation and our own personality traits. Yet other experts insist that we can make cognitive decisions as to which leadership style to chose for any given situation.
So is it personality driven, or cognitively selected? Probably a little of both, but the most accurate answer may not be so relevant. The point is that we need to be aware of which styles work for us under a given situation.
Still, there are a few absolutes about leadership, such as the axiom that leaders are ultimately responsible for mission completion. Leaders can delegate authority; yet they can never delegate responsibility.
This statement isn’t intended to detract from the function of the Non-Commissioned Officer (NCO) who’s primary purpose is the care of troops. While it is certainly the case that the NCO is also in a leadership position, more commonly the mission is lead by an officer with an NCO as the second-in-command. In this manner the officer is ultimately responsible for mission completion, and the NCO is ultimately responsible for care of the troops. It is an unresolved paradox – and intentionally so.
That issue aside for the moment, let’s take an overview look at the four leadership styles: authoritarian, participative, delegative, and transformational.
Authoritarian Style
 Also called the autocratic leader. Authoritarian leadership is often misunderstood by the academic community. It is commonly misdiagnosed as a “selfish” form of leadership in which subordinates are yelled at and belittled. However this is not a good example of authoritarian leadership. Indeed, it is not a good example of any form of leadership. Such behavior is abusive, unethical, and probably illegal.
Authoritarian leadership style is commonly used when the leader has the necessary information and time is critical. Autocratic leaders are often excellent in crisis management because decisions are made and communicated in a timely manner. Furthermore, autocratic leaders are particularly effective when subordinates are inexperienced but motivated.
Still, the authoritarian leadership style has its limits. This approach to leadership stifles teamwork and creative solutions because team members cannot see the decision-making process and “buy in” is limited. Also, because the autocratic leader makes all the decisions, this forces talented professionals to seek promotion, experience, and recognition elsewhere, while it retains inexperienced team members and mediocrity.
A discussion on the authoritarian leadership style would not be complete without a cautionary note on a variant of this style called “rule by exception.” In this wicked form, the autocratic leader takes on the pretense of mentoring subordinates by withdrawing from the decision-making, and then punishing the subordinate for not leading in exactly the same manner and/or making the exact same decision that the autocratic leader would have. Conversely, the autocratic leader might reward the subordinate for coming to exactly the same conclusion and/or mimicking the behavior of the autocratic leader, thereby setting a standard of absolute power for the leader.
To rule by exception delegates absolutely no authority in subordinates to make a decision. It merely gives the pretense of doing so. This perversion of leadership strikes fear and paralysis into the team members. (And often it is intended to do exactly that!)
Simply put – if you’re going to delegate authority, you no longer get to make the decision of how the task is completed. Back off. Let the subordinate leader make decisions as they see best.
Participative Style
 The participative form of leadership is excellent for building esprit de corps within the team. It is also suitable for mentoring subordinate leaders into higher levels of leadership position and experience.
The participative leader understands that he or she does not have all the answers to each situation that may arise. As such they seek the council and expertise of their team members for multiple possible solutions, and select the best solution, often through consensus. This leadership style has the additional benefit of expressing value for subordinate team members’ talents and opinions. Most industries recommend participative leadership as the default style.
However, when time is critical, working toward consensus may mean failure. Under the stress of emergency situations, participative leaders can appear weak and uncertain of themselves. Be careful here. There is a time and place to be authoritarian in approach to leadership.
Delegative Style
Also called laissez faire leadership. Delegative leadership is excellent for division of authority to more readily manage large tasks, though ultimately the delegative leader is responsible for the decision.
Delegation of the decision-making demonstrates an absolute trust in the subordinate leader(s) to make reasonable and effective choices. Note that the term “right choice” was not used because that would suggest only one outcome was acceptable. Instead, delegative leaders openly embrace the notion that there exist multiple solutions for any given problem. As such, the delegative style of leadership is very effective when subordinates are experienced and bring unique expertise to the team.
However, when over used, the delegative style of leadership creates high levels of anxiety in subordinates. Subordinates often cannot see the immediate impact of their decisions and this lack of feedback creates unacceptable levels of stress. The delegative leader may eventually be viewed as lazy, incompetent or uncaring by subordinates. Be cautious in application.
Transformational Style
Transformational leadership is about implementing innovative ideas to change self, others or the organization. Unlike transactional leadership styles (authoritarian, participative, delegative) that work within the status quo to achieve success, transformational leadership brings innovative change.
 Yet in order to innovate, transformational leaders also destroy or abandon the status quo. This can be dangerous and even catastrophic. Some of history’s most famous and infamous leaders were transformational in their approach. Jesus Christ transformed the Judean religion. Mahatma Gandhi transformed the ruling influence of the Indian subcontinent. And Adolf Hitler transformed the impoverished German state into a global superpower.
When done well, a transformational leader is inexplicably brilliant. Inexplicable, and yet such transformational leaders appear to have at least three consistent qualities: charisma, vision and influence. All of these qualities are elusive and nearly impossible to teach. But they can be learned through experience.
Charisma – This is hard to define, but like art, you know it when you see it. Transformational leaders might be described as constantly seeking to move beyond their own limitations, and inspiring others to do the same.
Vision – Transformational leaders visualize, describe and direct. They describe a compelling vision of the future that motivates others to action. They describe the conditions necessary for success.
Influence – If effective management relies on authority, then effective leadership relies on influence. Transformational leaders offer new ways to look at old problems, encouraging new solutions. They are adept at aligning the goals of their followers with the leader’s vision.
Again, the question at hand is not “which leader are you?” Instead it is “which leadership style will you assume, and in which situation?”
There is no single most effect style. However, this assertion does not relieve us as leaders of our responsibility to complete the mission. The success of the mission often depends on the character, the quality, and the approach of the leader. This is what we mean when we say the leader must impart Commander’s Presence amongst their subordinates.
This article was originally published on odjournal.com (Olive Drab: the journal of tactics) and has been transferred here with permission.
Know Your Gear: Night Vision & Observation Devices
For the record, Night Observation Device (NOD) is the more encompassing term, as compared to Night Vision Goggles (NVG) and Night Vision Devices (NVD), which generically refer to both passive and active light amplifying equipment. This distinction may seemed nuanced, but when we think in terms of NOD we must avoid thinking of only NVG.
As we’ll discuss, NVG represent some of the most significant advances in NOD and therefore in night fighting. Regrettably then the tendency for many tactical units is to lean on the crutch of NVG technology rather than employing NVG as a means to enhance already sound night fighting Tactics, Techniques and Procedures (TTP).
This article will not address night fighting TTP, per se. They are ably covered elsewhere. However, we will look at the larger spectrum of NOD and define how each system helps us conduct the business of warfighting in periods of darkness.
First and foremost we must define the function of all NOD under the umbrella of three applications – visibility, detection and targeting.
Visibility has the broadest function and includes everything from driving and piloting vehicles, to navigating terrain on foot, to reading maps or text documents, to medical care. Visibility is the catch-all application for tasks that are not enemy-oriented, yet still must be achieved in periods of darkness.
Detection is the function of discovery. In this application NOD not only help us find the enemy, they may also help us determine friend from foe.
Targeting is a slightly different function from detection then in that targeting means we need to make ready a specific weapon system to engage an enemy or suspected enemy. Of course, we don’t actually engage the target until we determine whether it is friend or foe. Typically detection comes first, then targeting. But this is not always the case.
Forward Looking Infra-Red
Forward Looking Infra-Red (FLIR) is used primarily for detection and targeting. FLIR devices represent the most advanced break through in NOD. These devices include the older tripod-mounted AN/TAS-6 NODLR, as large as a microwave oven and whirring noisily, to the newer AN/PVS-22 and T-14 that are small and light enough to fit comfortably onto an M4 carbine and still offer the same picture clarity as the older models.
FLIR turns night into day, and sees even through vegetation and smoke during daylight operation. When looking for a sniper team in late spring, a search team walked more than a kilometer of dense tree line visibly looking at the ground for the hidden team in broad daylight. Back at the sniper team’s target, the same search team then turned on their T-14 FLIR and could instantly, clearly detect and target the two-man sniper team in spite of their being hidden with ghillie suits under heavy vegetation more than 300 meters away. The sniper team might as well have had a neon sign lit overhead. Through FLIR they were hopelessly exposed to counter fire.
FLIR may be used for navigation but only on expensive, extremely specialized vehicle platforms. Those rare instances aside, FLIR in its current form is not useful for map reading, walking over the mountain while avoiding cliff drop-offs, or administering aid to casualties during hours of limited visibility – yet.
For the time being, FLIR is most advantageous when used for targeting and detection. We’ll continue to see advances in this very promising NOD technology.
Passive Light Devices
Passive light devices amplify ambient light in an optical tube so that an image is created for the viewer during conditions of darkness. Because no form of light is projected, other forces using similar passive light systems cannot detect the use of a passive light optic.
There have been a series of developments and advances in passive light devices since the late 1960s beginning with the first generation AN/PVS-2 rifle scope. Second generation AN/PVS-4 scope and AN/PVS-5 night vision goggles were considerable steps forward in clarity of the tubes and image. And third generation AN/PVS-7 goggle and the versatile AN/PVS-14 monocular goggle/scope permit light gain even when used in conjunction with other intense light sources. This allows the user see into dark shadows and corners with other light sources present.
Passive light devices are used for the widest range of function including the full spectrum of visibility, detection and targeting. Some devices are, however, dedicated to a specific function. Scopes for example are often used exclusively for targeting, while the more common goggles are used to scan the battlespace to navigate as well as detect and target the enemy.
Active Light Devices
A precursor to the passive light system, active light collecting tubes gain projected infra-red (IR) light – invisible to the human eye. Used for detecting and targeting purposes, an enemy force without similar technology would be completely unaware that they were being illuminated at night. However, forces with other active or passive light systems would see another active light system clearly due to the projected IR light.
Active light systems still exist today, though active light systems are less commonly used for detection these days due to the fairly common access to commercial active and passive light NOD. Currently, active light systems are often dedicated to targeting, such as the IR laser pointer in the AN/PEQ series targeting devices.
Additionally there are specific active light systems for medical support and combat service support functions.
White Lens Weapon Light
One of the most recent additions to NOD is actually one of the oldest. The flashlight. However weapon lights offer significantly more power, putting out 65, 120 and even 220 lumens compared to the old camp flashlights dim 5 to 10 lumens. It puts a spotlight in the hands of each warrior!
The blinding power of the popular SureFire and Blackhawk Gladius series lights can temporarily disorient a foe without inflicting any harm. This gives the weapon light a definite advantage in targeting, and also for the confirmation of targets prior to engaging with deadly force. This makes the weapon light ideal for nighttime raids and ambushes.
Regrettably, many warriors carry the weapon light on their weapon, switch ready, while patrolling. This is a recipe for disaster as the warriors carrying their weapon light in such a manner tend to experience an alarming number of negligent discharges of brilliant white light, visible to even the naked eye. This makes the entire patrol vulnerable to enemy detection.
Weapons lights are not suitable for detection, as a general rule of thumb. The white lens may give the user a feeling of confidence due to the spotlight effect, but it also makes the user an easy target for enemy gunners! Scanning the battlespace for enemy can only be achieved safely in very specific instances. When used in this mode, weapon lights are commonly coupled with an IR lens covers so that the weapon light becomes a powerful part of an active light system.
Color Lens Flashlight
Flashlights have been around for quite some time now. Of course white light renders the flashlight a tactical liability in the battlespace. However with red, blue, green or diffused lens covers such flashlights become viable NOD for use in visibility applications.
Patrols can signal each other, vehicle drivers can guide on different colored lens, leaders can read maps, medics can tend wounds, radio operators can read documents and vehicle crews can pull maintenance all with colored lens flashlights.
And since colored lens put out considerably lower levels of visible light, they are more difficult to detect with the human eye than white light. Indeed, recent advances in light division technology has seen several new lens introduced that are surprisingly difficult to detect even with passive and active light systems.
Pyrotechnic Flare
For centuries field artillery has employed the pyrotechnic flare. This NOD is used primarily for detection, though with a few techniques riflemen and artillery gunners can employ their weapons for targeting purposes.
Most effective for detection are aerial parachute flares which when fired in sequence can provide sustained light for extended periods of time. Of course, the problem is that regardless of the type of flare, such pyrotechnics work both ways. Flares allow the enemy to see just as well, and are a clear indicator to the enemy that they have come upon an enemy force.
But when used cleverly, pyrotechnic flares illuminate the enemy as they’re moving through open terrain for friendly forces that are already in camouflaged, defendable fighting positions.
Strobe & Chemical Cyalume Light
Various colored chemlights (Cyalume) and strobe lights, including those with IR coverings are NOD used for a variety of visibility applications. In addition to the nearly identical applications of colored lens flashlights, strobe and chemlights are commonly used to guide patrols plus airborne and land-borne vehicles by marking targets, paths, boundary limits, and even landing zones.
In rare instances chemlights and strobes have been used for targeting and detection. Employed as field expedient backlighting, particularly in urban operations, these relatively low-light NOD can create enough light to detect and even target enemy movement.
Guy Lines
Didn’t see that one coming, did you? Yes, almost as old as fire is the use of twine or gut as a guide for warriors moving at night – making guy lines one of the oldest NOD in our inventory. Of course more recently it has been communication field phone wire, a dying relic on the battlefield.
Nonetheless, guy lines are still a valid form of NOD used for visibility applications to mark paths, boundaries, assault positions, and targets. Guy lines are employed almost exclusively for navigation, yet when used in conjunction with chemlights can become quite a sophisticated system for moving troops at night. Guy lines do require plenty of advanced planning and placement during daylight scouting missions.
Of course, the guy line works both ways if found by the enemy. But again, depending on the level of sophistication even this fact might work in our favor.
The important take-away from this article is that NVG such as the superbly efficient PVS-7 becomes all the more effective when used in tandem with other forms of NOD and their unique capabilities. Furthermore, when used with existing TTP for the various other forms of NOD, we have backup systems upon backup systems. And that makes us better night fighters.
This article was originally published on odjournal.com (Olive Drab: the journal of tactics) and has been transferred here with permission.
Worst Case Scenario: Behind Enemy Lines
“We’re paratroopers, Lieutenant. We’re supposed to be surrounded.” – CPT Richard “Dick” Winters at the Battle of the Bulge
It’s an oddity of battle that there are numerous tactical reasons to find oneself behind enemy lines. An envelopment or in the case of airborne troops a vertical envelopment will almost invariably and intentionally place friendly forces behind enemy lines to achieve specific effects.
Of course, this is not what we mean when we say “caught behind enemy lines.” This expression refers to those cases when our troops unintentionally find themselves behind enemy lines – be it the result of a delaying force conducting retrograde that was cut off from their retreat; or an attacking force that simply pressed too far ahead for the overextended main body, reserves and logistics to keep pace.
Thus, while CPT Winters’ comments at the Battle of the Bulge are admirably stoic and even border on heroic, the situational assessment of the young armor officer, to whom CPT Winter’s was speaking, was probably more accurate. The US paratroopers had not been dropped into Bastogne. They walked. And the German Army was rapidly enveloping them.
Whatever the cause, being isolated behind enemy lines is a perplexing situation as well as a considerably dangerous place to be! Behind enemy lines friendly logistics are hard pressed to re-supply your force on ammunition, water, batteries, medical supply or evacuation, or even achieve something so mundane as to feed your troops. Things could get desperate, quickly.
Furthermore, the enemy is bound to outnumber you, and if they haven’t discovered your force yet, they likely soon will. Time isn’t on your side.
If this doesn’t sound bad enough, realize that linking up with friendly forces isn’t as simple as just surreptitiously maneuvering across the battlefield to some imaginary line on a map. Oh no, some friendly unit somewhere close by just took a mauling. Think about it. If that wasn’t the case, your unit probably wouldn’t be stuck behind enemy lines right now.
So merely waltzing up to the good guys and saying, “Hey it’s us. Red rover, red rover, let us come on over” isn’t going to cut it in middle of a violent melee or its immediate aftermath. That’s a good way to get killed by friendly fire. The troops are nervous and probably ready to shoot the first target they encounter. You have to approach with a healthy amount of careful coordination.
But the news may not be all bad. You’ll have to take a quick assessment of your situation and look for opportunities to emerge.
Timing and Proximity
Frankly, if you’ve just been cut off in the last half hour or so, and are in close proximity to your line, listen to the battlefield. You are likely not out of ammunition yet. You have an opportunity to strike the enemy from a direction for which they are simply ill prepared. And the defeat of an enemy force may very well create an opportunity for you to link up with friendly forces.
Be careful here. Remember that the friendly line will be shooting direct fires and indirect fires back at the attacking enemy force. If you get in too close to their formations, you’ve become a target for friendly fire – and they almost certainly don’t realized that your small force is mixed in with the enemy. You could wind up on the receiving end of both friendly and enemy fires simultaneously.
 On the other hand, if you play it too far back you won’t be able to significantly contribute to the fight. The idea is to position your team so that you can place punishing fires on the enemy at key points in their assault – against the rear of their support section, or on the flank of their breach team. A hard hit against one of these teams might very well sway the balance of the fight.
When the enemy is repelled and falls back off the objective, you must make your team’s presence known at the first available lull in the firing. Again, expose yourself too quickly and you’ll be mistaken for an enemy force. Wait too late and both forces may have maneuvered so drastically that you’ve become lost again.
It is critical that you do not attempt to reenter the friendly lines during an enemy attack on the friendly unit! Again, that’s just too much coordination for the unit under attack to bear. It will end disastrously, regardless of the best intentions.
Daylight vs. Nighttime
If you are not in the immediate vicinity of friendly forces, the opportunity to slip back into friendly lines may be more difficult. In fact, you may already be surrounded by enemy forces. This situation dictates that you almost certainly have to slip away during periods of darkness.
Communication is critical. You’ll have to contact the nearest friendly force and coordinate a far recognition signal and a near recognition signal. Furthermore, you’ll have to establish a time and place for your team to approach the friendly line. Under periods of darkness, this can be daunting.
Truth be told, the same information is required to reenter the friendly line during daylight hours, but since visibility is an advantage in daylight, the coordination is much easier. And the friendly troops are a bit less nervous.
If you can pull it off at all, reenter the friendly line during daylight hours.
Using either speed or stealth, or a combination of the two, maneuver to the determined location of the friendly line. Immediately offer the far recognition signal in the manner prescribed – i.e. pop a color smoke, waive a color panel, or flash a color light lens – and wait for the friendly force to authenticate the color. Once they’ve done that, send a small link up team to render the near recognition signal as prescribed. This is usually a numbered challenge and password.
Once the link up has been achieved, a security team needs to collect or wave in the remainder of your team. Each member is counted in by name to demonstrate that everyone is recognized on the lost patrol.
Going in Blind
But what if you have no communications with the friendly forward line (FFL)? What if you must evade the enemy while crossing a large engagement area – “no man’s land”? And what if local friendly forces are unaware that your unit is cut off?
 Okay, this is the worst of the worst case scenario. It’s definitely not a desirable situation to be in, and so I’m going to suggest the only solution I can think of. Surrender.
No, not to the enemy! Surrender to your own friendly forces. You may need to cache your weapons and equipment nearby for later retrieval. Select the most inconspicuous path toward the FFL and move carefully toward friendly forces. Once you’re team is within sight, select a small team to stand up and wave the white flag of surrender – white under pants, a t-shirt, several pairs of white tube socks. Oh heck, it doesn’t even have to be white.
The important thing is to wave something during hours of excellent visibility so that the friendly forces can see that you are unarmed and attempting to surrender. Once they understand this, the battle is half over for you.
Yet remember that if your team is exposed in a particularly large engagement area, you are also vulnerable to enemy fires. You need to get your team out of the engagement area as quickly as possible, while making it clear to the friendly forces that you are surrendering.
Again, linking up with the FFL from the enemy side of the engagement area is daunting at best, and should be done during daylight hours if at all possible. Careful communication and coordination must be implemented. In lieu of this solid advice, simply surrender to the good guys.
Hey, humiliating as it is, it’s much better than the alternative – surrendering to the bad guys!
This article was originally published on odjournal.com (Olive Drab: the journal of tactics) and has been transferred here with permission.
Battle Rattle Radio: Decisive, Shaping, and Enabling Operations
This article was originally published on odjournal.com (Olive Drab: the journal of tactics) and has been transferred here with permission.